12.26.2011

Begin...

With christmas over, I always feel that I have this "prep" week for the new year...sorta like getting ready for the first day of school when I was a child...buying new shoes, getting a haircut, sharpening pencils...there is something about turning to the new calendar that refreshes me.  I've been cleaning up my desk and my office...my studio is next but that's a bigger task...I've also decided to adopt a word for the new year...I've been reading about other artists and the word they have chosen...sorta like a mantra...my word for the new year is BEGIN

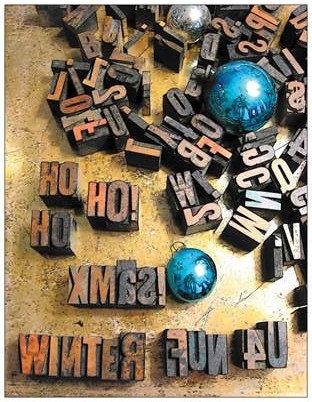
The seed for this word germinated a couple of weeks ago...I was reading about Cloth-Paper-Scissors magazine request for original art...they were planning a freeArt event...an event where original art would be given out on the street to anyone who wanted it - for free!  I loved this idea...one of the reasons I create art is to share it with others...I have no pretense that I'm creating any great masterpiece...just my own view of the world at any given moment.  I used a digital reprint of one of my original altered photographs and mounted it on a piece of corrugated cardboard, sewing the edges with red silk thread...it seemed to be lacking something...and usually whenever I think something is lacking, I try to fill the void with a word.  And the word that just came to mind was BEGIN...I stamped it out in white paint...it wasn't very bold...but if you looked, you could see it...


And the more I thought about it, the more it seemed that this word would be a good mantra for me for 2012...just begin...no more waiting
until everything was right,
or until I had time
or until I had all the materials
or until, until, until....ad nauseam...
instead...begin

no more waiting until I master Photoshop to participate in expanding my techniques...I signed up for Kim Klassen's e-course, Beyond Layers

no more waiting until I am a full-time artist to validate my artwork...I am getting my portfolio together to submit to more art shows

no more waiting for the perfect purpose to use my junk accumulation...either its getting put to use in an identifiable project or its being donated/cleared out of my studio so I have room to work

well, this should keep me busy for a while...what about you?  what's your word for the year?

The Lettered Cottage is featuring "word of the year" party...I love reading what inspires others...come on and join me...
The Lettered Cottage
and to keep me honest in what I'm trying to tackle, I've signed up with "Imagine the Impossibilities" challenge...I'll keep you posted...

12.25.2011

all is calm...all is bright...

hoping that all the wonder of the season is yours this christmas...

12.23.2011

...and all the trimmings

a simple twig wreath is all my green front door needs for the holidays


its almost christmas...about this time, I like to sit back for a moment,
reflect and gaze at shiny ornaments...won't you join me...
a single red shiny brite ornament sets off the holly branches...
Some years we have a tree...some years we don't...this year, the tree top is in a vintage laundry basket at my space at Faded Elegance...the remaining bottom branches I stuck in this zinc flower bucket, adding in feathers, a nest and sentiments of the season...
Metal knitting needles are ideal for displaying my handcrafted tags of joy, peace & hope...
the bookshelves in the dining room got a little holiday bling too...
a rusty gold-mining pan filled with vintage ornaments and a single candle
completes this simple holiday decor...

Wishing all a happy and healthy holiday season!

Linking up to Saturday Nite Special at Funky Junk Interiors...lots of gazing over there...

12.21.2011

The box


My friend Sue and I have a holiday tradition...I'm not even quite sure how it started...or when...but I think it was well over 15 years ago that Sue gave me this small wooden box filled with cookies for Christmas.

The next year I gave the box back to her, again filled with cookies...and thus, the tradition started.  We traded the box back & forth, filling it with scrumptious treats...so scrumptious that my first golden retriever Max torn the lid off of the box one year to get at the treats...I repaired the lid with masking tape -which matches the color of the balsa wood and has held up surprisingly well for many years!

I don't know if this incident led to filling the box with other goodies instead of cookies...vintage buttons, hand rolled beeswax candles, ornaments, fragrant soaps and body cremes - all such items that have been in the box over the years.


We've even been saving the wrapping and the ribbon for the last number of years and re-using them...

This year is my turn to fill the box...I have some special items that are perfect for Sue...but I can't share here...she reads my blog...

Do you have any special holiday traditions, especially any that are eco-friendly?
I would love to hear about them!

12.18.2011

The Pulse - Master Class


I am honored to be included among the artists participating in Seth Apter's "The Pulse".   The Pulse is an online collaborative project that aims to introduce you to new artists, help you get to know familiar faces even more, and allow you access into the creative hearts and minds of a very talented crew of individuals. More than 130 artists have answered a series of questions which make up The Pulse. Their responses will be presented in a series of online posts which will run every Sunday.


The first project was Style File - click here for the post from Sunday, July 17 which featured my response to describing my artistic style.

The second project was Techniques and Tools - click here for the post from Sunday, October 16  which included my response to my favorite technique/tool.

The third project was Master Class, which asked what artist (living or dead) would you like to take a class from and why...my response is included in today's post...

Not only is he is renown multi-media artist in his own right, but Seth Apter is also a tremendous supporter of other artists...this on-going project is one example...and another example will soon be hot off the press..."The Pulse of Mixed Media"...click here for details and to sneak a look inside the pages...I can't wait until its published...until then, visit The Altered Page for more immediate artistic gratification!

12.16.2011

Wrap it up


On the downhill slide to christmas...
the decorations are up,
the presents are ready,
the dinner is planned...all that's left is the wrapping!
People usually fall into two caterories in this circumstance...
wrappers or non-wrappers...
and there's just no way around it...
either you like to wrap or you don't!


Keeping with my holiday theme of using what I already had, I extended this idea to my wrapping as well.  Several elements that I used in earlier projects, popped up here again...here's a quartet of ideas for you...


#1 - sheet from wallpaper sample book + "ribbon" made from striped vintage fabric.
Expired wallpaper books are ususally free for the asking at paint/decor stores...the paper is extremely durable and ideal for wrapping small gifts.  Fabric ribbon is all the rage...make your own by tearing strips of fabric...cotton tears the easiest...you can either notch or pink the edges for the finishing touch.


#2 - sewn dictionary paper + burlap letter tag.
I have numerous old dictionaries...I picked up one that was bound together with metal posts...I removed the posts and had hundreds of pages without a torn edge...I wanted interesting wrapping paper...I sewed six pages together, with red silk thread for extra pop.  All of the pages were from the letter "R".  To carry through the theme, I made another burlap letter stretched in a metal embroidery hoop (details here), tied on with red jute twine.


#3 - old map + vintage fabric belt.
I find old maps intriguing... something about scrutinizing all the highways & byways of a place...the allure of travel...use a map from a location that has special meaning for the gift recipient...wrapped up with another vintage fabric belt, complimenting the colors of the map nicely...a holly twig provides the festive touch.


#4 - kraft paper + drywall tape + holiday napkin tag.
I have mounds of kraft paper, courtesy of numerous thrift stores, wrapping my purchases ever so carefully...but by no means is any of this paper wrinkle free...I crunched it up even more and then ironed it flat with a dry iron...it smoothed out the paper but left the texture.  I used drywall joint tape to secure the paper around the box...love the texture on the tape!  Using another of my holiday napkins, I made a tag with a square piece of corrugated cardboard, embellishing the tag with white paint on the edges and a sentiment of "joy"...thin wire was used to wrap around the present and secure the bird tag with a couple of twisted flourishes at each wire end.


The Southern Man and I spent the day downtown Seattle, taking in all of the holiday hustle and bustle, enjoying a fabulous lunch and picking up a few last minute gifts at Watson Kennedy...off to finish up wrapping myself...need to get to the post office too!

Take a moment for yourself in all the hustle of last minute preparations...the season is meant to be enjoyed!  Take a minute and visit Funky Junk Interiors-Saturday Nite Special for lots of holiday inspiration to enjoy...and then hop over to FOLK Magazine blog for even more inspiring ideas...

12.13.2011

The sum greater than its parts, #5


I am down to the last two felted wool projects...I'm amazed with what I could get out of the scraps from the five wool sweaters I felted last year...


Project #1 - mini mitten garland


Keeping with the simplicity vibe, all I did was make a paper pattern for a small mitten and cut out lots of mini-mittens.  I stitched up the mittens on my sewing machine, again keeping the seam on the outside (just like the stockings) since the felted wool wouldn't unravel.  I embellished them with either red felt hearts, vintage pearl buttons or tiny glass ornaments.  I tacked the mittens onto a length of red jute twine and made a loop at each end of the twine for hanging the garland.

Project #2 - sweater cowl
I had a large portion of the dark gray sweater remaining...I measured 12" up from the ribbing on the bottom and cut a straight line across...after I folded over a cuff at the top and secured it with two pins, its perfect as a neck cowl...which is great because for some reason, my neck is always cold in winter!


the two "mini-pins" are actually a pair of earrings that my friend Sue gave me for my birthday, but they are just right to secure the cowl so its snug against my neck.


I saved the snips and scraps from all of these felted wool projects...it seems a shame to toss them...but I don't know what to do with them...I would welcome your ideas!

12.09.2011

The sum greater than its parts, #4


Going headlong into the holiday...still working on projects that use what I have at hand for inspiration and materials.  I wanted to create some original art that could be a gift...or an ornament...or both!


I had these paper napkins that I picked up at a summer yard sale...the napkins had a bird on the front - birds always catch my eye...when I looked at the package more closely, I saw that the design was by Gwen Frostic...I love Gwen Frostic...she was an artist from Michigan who was known for her woodcut designs and her inspirational books...she was very big among the camp counselor crowd I hung out with in the seventies...her look is very iconic and even Martha wrote about her designs in the March 2005 issue.  How fitting that I should honor her with a collage piece...


I had a half dozen of these mini canvas frames...they had letter designs on the front...a coat of white paint obliterated all...I glued the paper napkin with the bird image onto the front of the frame using my gloss medium method described here...
You can also see the old gummed label at the bottom edge...it was the same bright red tone as the cardinal...it was the perfect highlight...after I typed in a single word...


I have an old Royal typewriter just for designs like this...there is nothing like the old ink from an old typewriter to give that authentic vintage vibe...


I carefully placed the label so that the type would be centered...since the labels were so small, it took a few attempts to get it right...


After I was done with the front, it was time to finish the back of the frame...they were pretty ugly looking on the back...a square of vintage map with that perfect touch of red would be ideal...


Then there were the sides of the canvas...something more was needed...I recently bought a couple of rolls of that fabulous Cavallini paper tape...with the numbers and letters on it...but this project is about using what I already have...and wouldn't the vintage original cloth tape be better than the imitation paper variety...
I thought so...
Once everything was dry and all the edges sanded smooth, I waxed each mini-collage and tacked the cloth tape around the perimeter of the canvas...and this project was done...
the backside of the collage...love the colors of the map complimenting the colors of the bird...the red ribbon hanger (a single length of red satin ribbon held in place with a trimmers tack) was attached afterward...I remembered that if these are to be ornaments, they need a hanger!
 peace, joy, cheer, wish, hope...I think that sums up the season just fine...

Linking up to Saturday Nite Special at Funky Junk Interiors...ornaments are the feature this week...

12.07.2011

foggy mornings...


We've been having a spell of fog in the morning here...over the last week, there have been several mornings when the air is quite crisp (well, actually cold for here if truth be told!) and there's a light frost on everything...combined with the heavy fog, there's an ethereal quality to the day...


sometimes the sun will break through but just a block or two away, everything will be dense with fog...


gives a dreamlike quality to this holiday time...

12.05.2011

Buy Handmade


There's been a huge outpouring of support for buying handmade this holiday season...and to support small businesses...and why not - these gifts are not only unique, but their purchase strengthens local communities and supports artists.


This past weekend was teeming with community bazaars/artist shows/holiday fairs...whatever you call them, there was a flurry of activity...especially the one I attended...handcrafted candles, artisan soaps, beaded jewelry, carved wooden bowls, felted purses...really, something for everyone on your list.  I went to this particular show to support a friend and to foster creativity, whatever its form, wherever it exists...
snowmen by liz dunwoodie and cindy jurecic


There are 20 days left until Christmas...
so in the spirit of Buy Handmade, I'm offering 20% off all sales at my etsy shop...

set of 4 flat notecards with envelopes - "winter fun"
Junk Queen found object necklace
Multi-media collage - "Italian Experience"
you just might find the perfect gift to give...or keep for yourself!

20% off sale...good until December 25...
remember to enter HOLIDAY2011 when you check-out!

12.03.2011

A recipe for holiday cheer


Creativity usually has its spark in something I saw/heard/felt...or a mix of all...and then - eureka!  Such was the case with this project...

You may remember that I'm challenging myself to make holiday decorations with only the materials I have on hand...so I gathered up my supplies...


burlap and upholstery webbing...


wire and metal embroidery hoops...
And lets not forget the spark of creativity...here are the three ideas I saw over the last couple of weeks that converged in my brain and produced an inspirational storm...


I went to work...I cut out five squares of burlap and painted a white square in the center of each...once that was dry, I stamped a letter in gray ink in the center of the white painted square...once that was dry, I stretched each burlap square into a metal embroidery hoop and trimmed off any excess burlap.


Hanging the hoops would be easy since I could thread the jute twine through the spring mechanism at the top of each hoop...
Holiday Cheer!

I tied each letter onto the banister and then wrapped the upholstery webbing around the handrail.  Branches from the holly tree out back supplied the greenery with a touch of red...
the wire star on the newel post is the ending touch...I wrapped wire around a metal embroidery hoop - brilliant inspiration from JillRuth!
I like that its very simple and uncomplicated...and communicates the perfect sentiment of the season...
now there's an inspirational storm going on!

worth a look...

Related Posts with Thumbnails