4.27.2013

Simplicity in threes

Three old growth fir boards...the patina is so lovely...I couldn't bear to paint them...
rather I added a layer of wax to highlight the grain and their well-worn look...


Three vintage glass bottles...more oval than round...


Three old-school broom clips...


Three metal paper fasteners...from which I removed the flat metal sliders...to make them into label holders...


Add in three screws, some upholstery tacks and a couple of posies...
and you have three simple bottle vases...


Each vase is complemented with its own description adjective...culled from a vintage dictionary so the brown, aged paper highlights the wooden board...


Three vases...to use inside or outside...to hold a fistful of flowers...

or a single bud...

And while all of this commotion is going on in the garden...one patient dog waits for his walk...
Linking up to Funky Junk Interiors Saturday Nite Special...with a highlight on pets...
 

4.25.2013

Like a kid in a candy shop...

Next to getting money in the mail, finding out that I won something ranks right up there for me...early this morning...checking my email before work (that day job that interferes with my creative process!)  I found out that I had won a gift certificate from French Kiss Collections ...

For those of you who aren't familiar with this fab site...its a grand place to get all sorts of inspiration for editing your photographs...since I  have become enamored with Photoshop Elements and discovering all the variations of what one can create, its been a glorious exploration of creative possibilities.  French Kiss Collections offers for sale a wide variety of premium vintage inspired textures, brushes and overlays to use with your Photoshop editing...most of it French-inspired (the designer, Leslie, lives in France with her French husband).

The drawing I won involved posting pictures either of your creative work space and/or you being creative...and winners were selected randomly - oh lucky day!

So before I scrambled off to work, I made my selections from the shop...it was tough but I finally whittled down my choices...and downloaded the files so I would be ready to play later in the day...

Here is my first image...a combination of old postcard, vintage bird etching and French postmarks...


My second design used a photo I took last weekend of fresh tulips...editing in Elements with two grunge textures and an overlay of an old French sales receipt...


I can tell that this is going to be quite a diversion from work at hand...
I encourage you to check it out...creativity loves company!

4.22.2013

Art party redeux


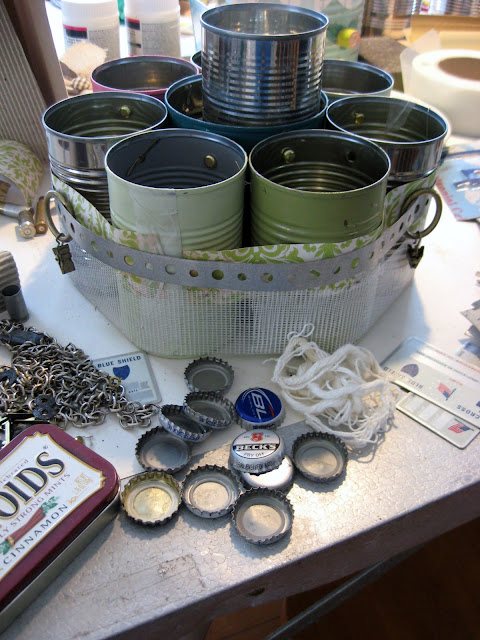
Start with a studio crammed with supplies...
and an obsession with tin cans...


Add in four creative artists...with plenty of glue, rivets, wire and gumption...


Fueled by tasty treats and a bit of red wine...


And you have an art party!

After hosting February's inaugural art party, I decided to make it a (semi) regular event...this time the loose theme was May Baskets made from tin cans...but given any one's inclination, it could be whatever one wanted to make...given the peculiarities of schedules, not everyone from the original group could participate...but that did not diminish the enthusiasm of our Saturday afternoon soiree...

After a couple of hours of creating/chatting/nibbling/pounding/drilling/gluing/kvetching/incubating/laughing, here are the end results...


Jane Ann used a smaller can to make a petite basket, holding a bouquet of paper petals...


Shelley made two creations...using the rusted metal items she had previously created in her studio...here's one up close...her other creation is the can with the metal arrow and heart pictured in the group photo...


Jody decided to take a different route...and set upon creating an organizer for her studio...here it is in process...


and then she sent me a photo the next day...project completed and already put to use!


Here's my creation...love the handle from an old iron kettle...with Shelley's help, it fit just fine...

 
For each of us, it was a relaxing break from a host of other creative projects...let me give you the rundown...
 
Shelley Holm - From the Alley to the Gallery - is in the throes of prepping for one of her biggest shows of the year - Sorticulture.  Its a combination  art and garden show...here in Everett, June 7, 8 & 9.  Shelley also shows her art at a gallery here in Everett, We Do Art...
 
Jane Ann Engel is an accomplished viola player and is in rehearsal for a local production of the musical "South Pacific"...get all the details here...
 
Jody Carlson Cain - Latitude Studios -  will be a artist vendor at the upcoming Farm Chicks Show...and she is an exhibiting artist and instructor at the Schack Art Center here in Everett...she presently has two creations in the current curated show, The Creative World of Book Arts...
 

Meanwhile...its Monday morning...and I need to clean up my mess from the weekend...I couldn't just stop with one can...see what I mean about an obsession...

4.18.2013

Unlikely combinations

You wouldn't ordinarily think of pairing rusty pin nails with fine silk thread...but then I like to think that I'm not ordinary...thus the tag line of my blog (and my business) "creative combinations of everyday ephemera"


I often find that I stumble upon an idea...in this case, a creative process...and then I see how many different ways I can use that process...in particular, using thread and nails to define a boundary...

Since I never like to throw anything away...I have been looking for months at a box of MOO business cards that I ordered...which I had screwed up my contact information...but I had 100 skinny cards...with my collage images...suddenly I had a eureka moment...what if I make a collage out of the cards...

I sorted the cards according to theme and/or color, looking for striking combinations...then I set out to have 6" rectangles cut out of 1"x6" pine boards (I love the guys in our Lumber dept. at work...always willing to help me out with my creative ideas!)

I painted the sides and back of each rectangle a solid dark color...and then created a layered paper design for the front which would be the background for each mini-collage.  Since the mini-collages would be digital copies, I made the layered background different for each collage, using original ephemera...so the recipient wouldn't be getting a total original piece of art...but they wouldn't be getting a total reproduction either...instead, a combo of both!


I wanted a way to frame out each mini-collage...to make it stand out a little more from the background...so I hammered a small wire nail into each corner...and wrapped a length of silk buttonhole twist around the outside perimeter of the collage, securing the ends of the thread with a knot at one of the corners...
 
I think it adds the finishing touch I was looking for...


The type of this dictionary page was a little too intense...a layer of gray tissue paper tones it down...


I looked for papers that would relate to the collage subject...a geographic listing of towns is well suited for this travel motif...
 
And an old French letter is a great match for this collage...
Thirty of these mini-collages will be part of my booth at the upcoming Farm Chicks show...June 1 & 2...there's a giveaway going on over at The Farm Chicks blog for free tickets to the event...deadline to enter is Sunday night, April 21...so get over there right now...I want to see you at the show!

4.15.2013

Discoveries


Lately I've been keeping my nose to the grindstone...
so I haven't ventured out much...don't want too much distraction keeping me from projects at hand...


But when I saw the ad in the Friday paper for a church rummage sale, I figured that I could spare a few minutes...

This is what I love about living in a smaller community...this local church has a sale every year...I've been going for some time...I always seem to find something of interest...and its only a couple of blocks away from my house...I went this year in search of canning jars...of which there are usually boxes of jars...but not this year...I guess that idea of using a mason jar for every possible use but canning is catching on...


Although I did find a few other items...

I actually found three of the vintage muffin tins...some might be used for altered art...at least one I'm filling with potting soil and planting grass seed into each compartment...I always like a little greenery in the house and these six little green mounds will be perfect in a couple of weeks...

I love the texture of the peat pots...they might have something planted in them...
or maybe turned into another project...


The four linen napkins have exquisite texture...heavy weight linen with a finely executed pulled thread
embroidery motif...I'm in awe of such delicate handiwork...

the miniature strainer...old metal married with weathered wood...need I say more...


The French glass canning jars have already been put to practical use...one is holding sunflower seeds...
the other one, dried lentils...


And this was not the sum total of my purchases...I also picked up a heavy duty vintage colander, a roll of tulle, two vintage kitchen utensils and a sweet lily of the valley linen tea towel...all for under $5...as the elderly women were packing my items into my bag, I explained what I was doing with some of the items...they especially liked the idea of using the roll of tulle as "ribbon" for wrapping presents...and were impressed that I had brought my own recycled bag to carry home my purchases...their parting comment was, "We like the way you think!"  It made my day!

Did you go out junking this past weekend?  what did you find?


4.11.2013

Going international

I wish that I was travelling someplace overseas...but alas, just my photos and project ideas...

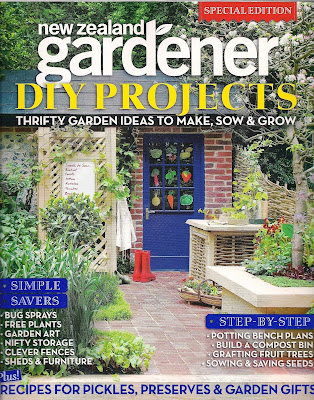
My garden tote was recently highlighted in this New Zealand gardening magazine...


I was thrilled and honored when they contacted me...the wonders of the internet...where the sharing of ideas and projects is not confined by land boundaries or time zone changes...here's a snippet of the two pages on clever DIY garden ideas...


I was pleased to receive a complimentary copy of the issue - it was fantastic!..jam packed with lots of garden/outdoor design inspiration...I don't know if this magazine is available anywhere in the States, but they do have a wonderful website...http://www.nzgardener.co.nz/

And if you want to see the details on my recycled garden tote...you can find that tutorial here...

4.08.2013

oh so blue...

My garden is awash with pops of blue...the grape hyacinths are in full bloom...so even though we are back to gray and cold...those blue blooms are a reminder that it will only get warmer...

Clipping a few buds to bring inside...I have quite a collection of silverplated salt and pepper shakers...
you often find just one at a yard sale...having lost its mate ages ago...the details can be so intricate...

 
These shakers are perfect for small stems...some of them fit through the holes of the shaker, helping to keep the stems upright...taking the top off of another shaker gives plenty of room for blooms...a miniature vase...
fits on my kitchen window sill...a beautiful reminder...of all yet to come...


4.05.2013

My favorite tools

In the midst of starting a new project today...clearing off a space on the dining room table...because I have no other work space left...I always make sure that I have my favorite tools at hand...and thought I would share them with you...

First a word about my new project...I spent a wonderful afternoon earlier this week brainstorming with my art friend Jody Cain of Latitude Studios...we are both vendors at the upcoming Farm Chicks show...she has been a vendor before so I wanted to pick her brain...and she wanted to pick mine for display ideas.  Its a godsend to have another like-minded artist to spark ideas...when I got home, I started to play with all sorts of stuff sitting on my office desk...piles of stuff that I know I want to do something with...but just not sure what...and I'm afraid that if I put it away someplace...well, its that "out of sight, out of mind" thing...

I have a box of MOO cards that I ordered last year...MOO is a printing company out of England that is changing the mindset that your business card needs to be a standard size and rather boring...with the cards I ordered, I screwed up my contact information (my fault - not theirs) but I still had 100 cards with my art images printed on them...what to do...


Somehow it came to me...a "eureka moment"...to group images together into a mini-collage...so after getting a pine board cut into pieces...and determining the sequence and layout...I'm on a roll...the boards will be painted and a coordinating piece of vintage paper will be the background for each collage...I'll share when they are completed...


Back to my tools...I like to keep it simple...
these 4 tools are my mainstay and I probably use them every time I'm creating...

1.  Sanding block


I sand everything...my wood "canvases" to smooth the edges before I start...the edges of my collage to remove any excess paper...the surface of my collage to soften and "age" the final image.  I keep two blocks in my studio - one loaded with a #120 grit paper for final sanding and one loaded with #60 grit paper for initial smoothing.  I love the feel of the rubber block while sanding...I get an even application of pressure when using a block as opposed to an uneven, random effect when you just grab a piece of sandpaper and try to sand with little to hold onto...


2.  Chip brushes


I love using a chip brush...especially when I'm applying my glue mixture...it just seems to carry the right amount of glue and spread it evenly.  They're not expensive...and sometimes I do have to pull a loose hair out of the glue or paint...but they are natural bristle - not polyester or nylon - so they perform so much better.  And because they are natural bristle, I can use them with either a water based or an oil based medium with no worry that the bristles will dissolve or melt...


3. & 4. Brayer & seam gauge


My hard rubber brayer was one of the first tools I bought 15 years ago when I started being serious about art and launched my company, four corners design...I bought it at a wonderful art supply store in Neal's Yard, London...I paid a pretty pound for it...but it has been indestructible.  I use it to smooth out papers, press a clean fold, or even apply a thin layer of paint for texture on a collage.

My metal seam gauge is a lifesaver...it helps me place a collage element into position without being crooked, it gives me an accurate measure that I can calibrate with the slide indicator and the flush straight edge is invaluable in giving a torn edge to paper...I'd be lost without it...


Now that's it for hand tools...some day I'll talk about power tools...
Do you have any favorites?  That one item that is essential to your work?  I'd love to know!

worth a look...

Related Posts with Thumbnails